Setting up Java application with Hibernate – example
In the previous article, we learned how Hibernate can assist in database persistence. Now it’s time to see how to properly configure it in a standalone Java application.
After this step by step tutorial, you’ll have your first Hibernate JPA project ready. You’ll learn where to place the configuration file and which configuration options may be helpful. We will set up Hibernate with Maven, picking the right dependencies and annotating entity classes.
This article contains only the most important code snippets. Full Maven project can be found right here on Github. I encourage you to clone it and play around.
Schema
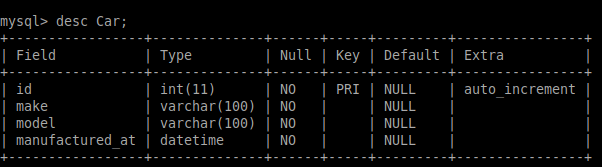
The database structure we’ll use with this example is really simple. It consists of single Car table. For simplicity, I’m using MySql as a database provider, but you’re free to use any vendor you like. You just need to remember to add a dependency to the right JDBC driver. Below you’ll find instructions on how to do it.
Configuring Hibernate standalone
Configuring Hibernate in a Java application means completing these three simple steps:
- Add dependencies to .pom file.
- Set up hibernate configuration file
- Create and annotate entity classes
I’ll also add a Dao, or Repository class, which will provide data access functionality to other classes in our application. This is not required, but it’s a common practice to isolate entity, data access and service layers, to ensure readability and separate each layer’s concerns.
Let us go over above steps one by one.
Adding .pom file dependencies
There are just two dependencies which you need to add to your project to start using framework in this form.
- hibernate-core
- mysql-connector-java
We’re adding a dependency to the newest Hibernate version, available at the moment of writing this article. Previously, configuring JPA with Hibernate required another reference to hibernate-entitymanager. Now it’s all available within hibernate-core package.
MySql connector will ensure proper MySql Jdbc Driver is at our disposal.
Setting up Hibernate persistence.xml configuration file
A file called persistence.xml is the main Hibernate configuration point. It’s placed under META-INF folder by default and has a relatively simple structure. It should contain at least one, uniquely named persistence unit. Each persistence unit has to contain a data source and a set of persistent classes in
We’re defining a hibernatePlayground persistence unit with a single persistent class called Car.
We’re also telling Hibernate to use MySql 5.7 dialect, as this is the database I’m running.
![]()
This property helps the framework adjust its SQL syntax to a particular database vendor. Hibernate is usually able to figure out the right dialect from JDBC Driver if the property is not specified.
The javax.persistence.jdbc.url is a connection string to our database. The url has the following structure
jdbc:[dbms]://[host]:[port]/[database name]?[connection properties]Connection string’s
useLegacyDatetimeCode=false&serverTimezone=UTC enables timezone conversions from client to server and the other way round. This will make date time-related columns always carry time in UTC zone, which is a good practice. Conversion to another time zone can be done on the client side.
Useful persistence.xml properties
Here are other common persistence.xml which may be useful in your application.
Setting this property will make Hibernate regenerate database schema at application startup.
Enables c3p0, an open source JDBC connection pool, which ships together with Hibernate. If any of the c3p0 properties are defined, Hibernate will use it for connection pooling. Above property indicates time after which idle connection is removed from the pool.
Setting this property is useful for performance tuning as it makes Hibernate generate useful statistics.-
These help visualize SQL statements which are sent to database. To see them, set the org.hibernate.SQL and org.hibernate.type.descriptor.sql.BasicBinder to the finest debug level in your logger setup.
Mapping entity classes
Entities are classes which have their representation in the database. They are simple POJO classes with annotations, describing how data stored in them maps to table columns. You only need a few JPA annotations to instruct Hibernate how to persist Car information.
@Entity
public class Car {
    @Id
    @GeneratedValue(strategy = GenerationType.IDENTITY)
    private Long id;

    @Column(nullable = false)
    private String make;

    @Column(nullable = false)
    private String model;

    @Column(nullable = false, name = "manufactured_at")
    private LocalDate manufacturedAt;
@Entity annotation denotes a persistent class. By default, Hibernate assumes your database table will have the same name as your class.
Each persistent class in Hibernate needs to have an @Id column. It’s not very convenient for application to manage Ids itself. With @GeneratedValue annotation, we’re telling Hibernate to rely on the database to generate Ids for us.
We want all columns to be non-null, and that’s what the @Column(nullable = false) annotation tells us about. Attempting to save a null value in any of the columns will result in an exception. This annotation is optional if you’re ok with nullable columns.
Database columns are named after class property names by default. With @Column(name=”manufactured_at”), we’re overriding the default naming strategy asking Hibernate to give the column a custom name.
Annotating the Car class as above results in the following data definition SQL statement.
CREATE TABLE Car (id int PRIMARY KEY NOT NULL AUTO_INCREMENT,
make varchar(100) NOT NULL,
model varchar(100) NOT NULL,
manufactured_at datetime NOT NULL);
Introducing a data access class
Data access class will help us isolate all the code related to persistence in a dedicated place. It will ensure our service classes are able to handle the required logic without worrying about how objects are stored in the database.
To accomplish this task, we’re using interfaces available in JPA API only. Hibernate proprietary API has their own interfaces, which can do the exact same thing, but in order to stick to the common standard we’ll use the official Java API
Here’s how we build our CarDao class’ persist method.
public Long persist(Car car) {
EntityManager EntityManager = EntityManagerFactory.createEntityManager();
EntityTransaction transaction = EntityManager.getTransaction();
transaction.begin();

EntityManager.persist(car);

transaction.commit();
EntityManager.close();

return car.getId();
}
As mentioned in the previous article, you don’t need to know SQL to start persisting data with an ORM framework. JPA API provides a few simple functions which enable us to do so.
EntityManager is a JPA interface representing a database communication. It’s created out of EntityManagerFactory, which is bound to persistence context. EntityManagerFactory is very expensive to create. It carries information about persistent classes, CRUD queries for all tables in the persistence context and more.
Operations which modify data need to happen in the context of transaction, as they have to be reversible. Calling persist() on EntityManager marks the object as a candidate to be stored in the database and assigns the id property. Committing a transaction causes EntityManager to be flushed and sends an insert query to the database.
Will it work ?
Ok, so we have our entity class and a Dao which will take care of storing Car data in the database. It’s time to put it all together.
Here’s a simple test explaining how to create a Car object and store it in the database with the use of Dao class.
@Test
public void whenPersistingNewCar_thenIdIsAssigned() {
    Car car = new Car();
    car.setMake("Honda");
    car.setModel("Civic");
    car.setManufacturedAt(LocalDate.of(2018, 10, 21));
    Long carId = carDao.persist(car);

    Assert.assertNotNull(carId);
}
Car is created as a plain Java object, so-called POJO. As in a regular object, we set the make, model and date of manufacturing properties. Next we pass the Car instance to the persist() method on CarDao. At that moment, Car instance is stored in the database.
It’s important to note that calling EntityManager.persist() will assign an id to our Car object, even though there’s no setter for this property. Hibernate uses reflection to assign values to properties when fetching data from database. It can use setters once you explicitly annotate accessor methods, instead of properties, with @Column annotation.
In the previous article, I said that using ORM frameworks reduces the amount of code required to communicate with the database. As you probably noticed, there is some configuration required in exchange for that. Most importantly though, the troublesome process of converting data from SQL to objects and the other way round is handled for us.
Stay tuned, next up we’ll be configuring Hibernate with Spring with and without the persistence.xml file.
- What is and why do we use Hibernate Framework.
- Explore how to configure a Spring and Hibernate application.
- Here’s a guide to Many to one JPA entity mapping